
The following video is best watched in at least 480p quality, full screen. If you have trouble watching the video, you may continue reading down below.
Disclaimer: Disabling Windows Update, while it doesn’t interfere with any other necessary processes on your machine, may pose security issues in cases where an urgent update is needed. Do this at your own risk.
Auto-update is a nice feature that we enjoy on a lot of things we use these days, but sometimes it interferes with other, more necessary, things. This was my case with Windows Update.
In an ideal world, I would always want Windows Update enabled and automatically running when I start my PC. Unfortunately in this real world of vague FUPs and poorly advertised bandwidth caps, that’s a luxury a lot of us living in the Philippines can’t easily afford.
To be specific, when Windows Update automatically runs on my system it eats up my download speed and part of my daily-capped bandwidth. Some days it just consumes all of my daily bandwidth limit causing my connection to throttle down to about 25% of the normal download and upload speed.
Simply stopping the service through Task Manager doesn’t seem to work (it keeps re-running). For someone who needs good connection to get most of the work done, that’s a problem I always try to avoid, and the same reason why I opted to take control over Windows Update.
Let’s begin!
How to fully disable Windows Update
To begin, be noted that doing this will cause the Updates & Security window to auto-close whenever you try to access it, but this can be easily undone as described in the next section.
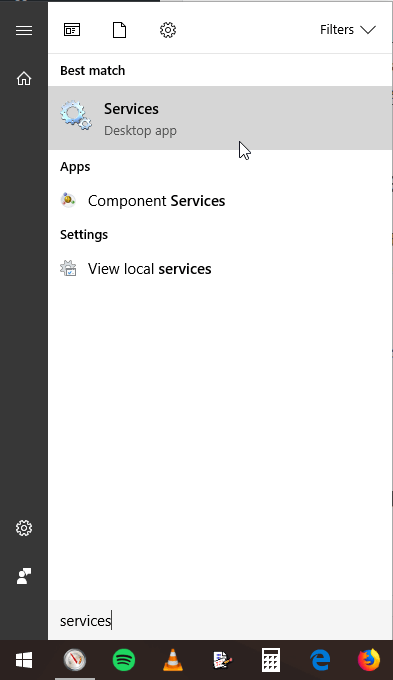
1.) Click on the Windows button and type in “services”. Click on Services in the results.
2.) In the list of services, find Background Intelligent Transfer Service, double-click on it to access its Properties window and do the following:
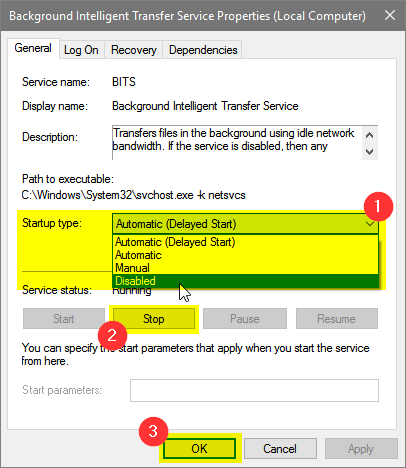
- Set “Startup type” to Disabled;
- In “Service status”, if it’s Running click on the Stop button;
- Click on the “OK” button to save your changes.
3.) Repeat step 2 for the following services in the list as well:
- Update Orchestrator Service for Windows Update
- Windows Update
4.) Restart your machine.
That’s pretty much it.
How to re-enable Windows Update
If at some point you’d like to actually get the updates, here’s how:
1.) Click on the Windows button and type in “services”. Click on Services in the results.
2.) In the list of services, find Background Intelligent Transfer Service, double-click on it to access its Properties window and do the following:
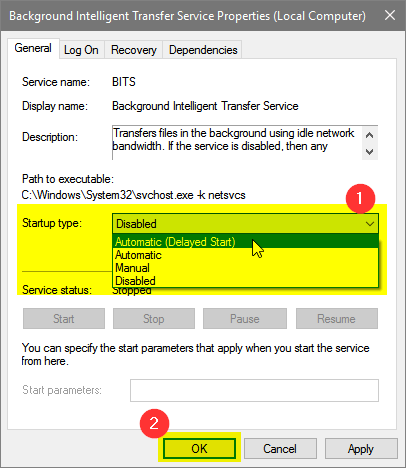
- Set “Startup type” to Automatic (Delayed Start);
- Click on the “OK” button to save your changes.
3.) Repeat step 2 for the following services in the list as well:
- Update Orchestrator Service for Windows Update – Set “Startup type” to Manual
- Windows Update – Set “Startup type” to either Manual (if you like to control when to check and download the updates through the Updates & Security window) or Automatic (Delayed Start)
4.) Restart your machine.
With this knowledge, we are now able to enable or disable Windows Update at will. Pretty convenient, right?
If you have questions or suggestion regarding the article, please feel free to drop a comment down below. Thanks!